Orville won the coin toss.
Wilbur pushed his brother down the short wooden ramp, and they made history. The plane traveled only 120 feet in 59 seconds, but it was a success. The Wright brothers’ 600-pound “Flyer I” was the first to achieve powered flight on December 14, 1903 in Kitty Hawk, North Carolina. In the words of the U.S. Smithsonian Institution, the aircraft was “the first powered, heavier-than-air machine to achieve controlled, sustained flight with a pilot aboard.”
The Wright brothers proved Leonardo da Vinci right: manpower alone was not enough for sustained flight. Centuries later, following study in aerodynamics and attempted early “flying machines,” Orville and Wilbur Wright put it all together, achieving the impossible that day. They completed multiple powered flights, redefining aviation and flight. Orville may have won the coin toss, but Wilber had the best run, traveling 852 feet in 59 seconds.
“I confess that in 1901, I said to my brother Orville that man would not fly for 50 years.”
– Wilbur Wright
The historical impact alone is enough to keep your students engaged in various scientific aspects of what the Wright brothers faced. Here are two activities that directly examine topics like torque, balance, motion and mass. Activities are from NASA and are appropriate for students in grades 6-9.
Science Activity 1: Balancing Forces
Objective
Students will understand challenges of making a powered flying machine.
Materials
- Handout of two diagrams for the 1903 flying machine
- Pencil
Considerations
Start the lesson by giving students some background to the 1903 flight. You could start by describing how the Wright brothers’ had been scientifically examining concepts of flight since 1899 in relative obscurity. In contrast, others, like the more popular Samuel Langley, failed to achieve powered flight. They all relied on “brute power to keep their theoretically stable machines aloft, sending along a hapless passenger and hoping for the best,” according to the Wright Brothers National Memorial. The brothers didn’t have that problem, given their careful calculations and planning.
Or, you can start by providing students with the immediate facts. The brothers needed to design a flying machine with an engine, but its placement was key. That was clear after the brothers had seen numerous crashes with their unmanned gliders the previous three years. Plus, you don’t have to look far to see how crashes and deaths resulted from early flying machines, such as Otto Lilienthal’s death in 1896 from injuries sustained in a glider crash.
Instructions


Ask students to draw where they would put the pilot and engine. Then have them work on the four follow-up questions.
- What are the advantages in the way you placed the engine and pilot?
- Answers will vary. Placing the pilot and engine side-by-side will be safer in the crash. If one is placed behind the other, this would allow for better balance.
- What problems could be caused by your placement?
- Side-by-side placement can create balance problems. If the pilot is in front of the engine, it could land on the pilot in the event of a crash. If the pilot is behind the engine, vision could be blocked, forcing the pilot to sit up.
- Does your pilot sit up or lie down? Why?
- Answers will vary.
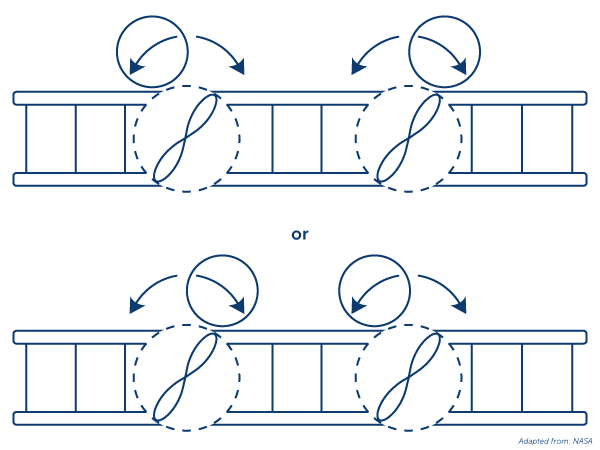
- How should each propeller turn to create the least amount of torque (twisting)?
- Propellers should turn in opposite directions (either both inward or outward). Turning outward, away from the nose of the plane, is probably best; motion helps to cancel out the torque each propeller creates.

What Happened?
How the Wright brothers placed the engine and pilot leads into the next activity. As for the propellers, they made them turn in opposite directions, cancelling out each propeller’s torque. They did this by twisting one of the chains used to turn the propellers into a figure eight. NASA offers more information behind propeller propulsion and concepts like force, torque and motion.
Science Activity 2: Center of Gravity
Objective
Students will understand how balance is a function of both mass and distance from the center of rotation.
Materials
- String
- 12-inch ruler
- Paper clips
Considerations
How did the Wright brothers approach placing the engine and pilot? They were concerned with safety, so they opted to put an engine on the wing beside the pilot. However, that created a balance problem, due to the weight of the engine compared to either Wilbur or Orville. Solving that issue forms the second activity of the lesson.
Instructions

Perform the following steps as a class or in groups. Or you can have students do them individually, if you have enough string, rulers and paper clips.
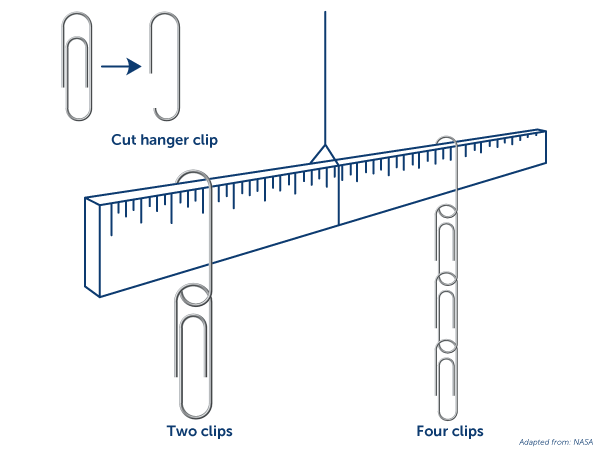
- Take the string and tie it around a 12-inch ruler in the middle.
- Create two groups of paper clips.
- Hook two paper clips together, representing the pilot.
- Hook four paper clips together, representing the engine.
- Open up one of the end paper clips on each group, as shown on the graphic, so they can hang on the ruler. Alternatively, cut the paper clip to size with a wire cutter.
- Hook the groups of paper clips on either side of the center, and then slide them along the ruler until it hangs level.
- When the ruler is level, the total weight of one set of paper clips (a) times the distance (b) from the center is equal to the total weight of the other set of paper clips (x) times their distance from the center (y). To illustrate this relationship, the equation reads: ab=xy.
- Write down the inch readings for each set of paper clips:
- Two paper clips set at ____ inches from the center
- 2
- Four paper clips set at ____ inches from the center
- 4
- Two paper clips set at ____ inches from the center
- One group of paper clips weighs twice as much as the other group, so the original group should only be half as far from the center. Check the inch marks to see if this is true.
The Wright brothers solved the balance problem by making the wing on the engine side 4 inches longer, adding extra lift to that side and balancing the plane.
- Simulate that solution by moving the four-paper-clip-group weight 1/4 inch farther away from the center so things are no longer balance. Instead of moving the two-paper-clip weight to balance, move the location of the string holding the ruler until everything is back in balance.
- Did you move the string toward the two-paper-clip weight or the four-paper-clip weight?
- Toward the four-paper-clip weight.
Expanding the Activity
Students can learn more at NASA’s page on center of gravity.
Learning More About the Wright Brothers
Sources like the Wright Brothers National Memorial and Scholastic offer additional background information on the Wright brothers. You can add to the lesson by providing more details and context about the brothers’ background, attempted glider flights, and the Flier I accomplishment. NASA’s handout provides more than 100 pages of activities that integrate history and science of the Wright brothers’ feats, featuring step-by-step instructions on building model gliders and the flyer.
You can also download this free worksheet to bring added value to your lesson. Allow your students to discover how flight happened!


